
Introduction: From Simple Pairs to a Complex Web of Connections
Welcome back. In previous lessons, we learned how to look inside a single "binder" (SELECT ... FROM), filter its contents (WHERE), and combine information from two different binders (INNER JOIN). Today, we'll become true data detectives.
Our task will require combining information not from two, but three different sources. And once we gather all the clues, we'll learn how to arrange them in a logical order so they tell a clear story. In karate, a precise move is important, but only combining several movements into a fluid, logical sequence (kata) shows true mastery. Let's begin our "data kata."
Part 1: Joining Three Tables – A Complete Order Picture
Imagine we want to create a report that shows us a list of orders, but for each order, we want to see two key pieces of information:
- The full name of the customer who placed the order.
- The name of the shipping company that delivered the order.
If we look at our SQL Tryit Editor tool, we'll see that we need three tables:
Orders– this is the heart of the operation; it containsCustomerIDandShipperID.Customers– from here, we'll get the customer's name (CustomerName) based onCustomerID.Shippers– from here, we'll get the company name (ShipperName) based onShipperID.
Our Orders table is the central point connecting the other two. Therefore, we need to perform two joins: first, we'll join Customers to Orders, and then we'll join Shippers to that result.
In the MS Access dialect, which our tool uses, it's crucial to use parentheses to group joins.
SQL
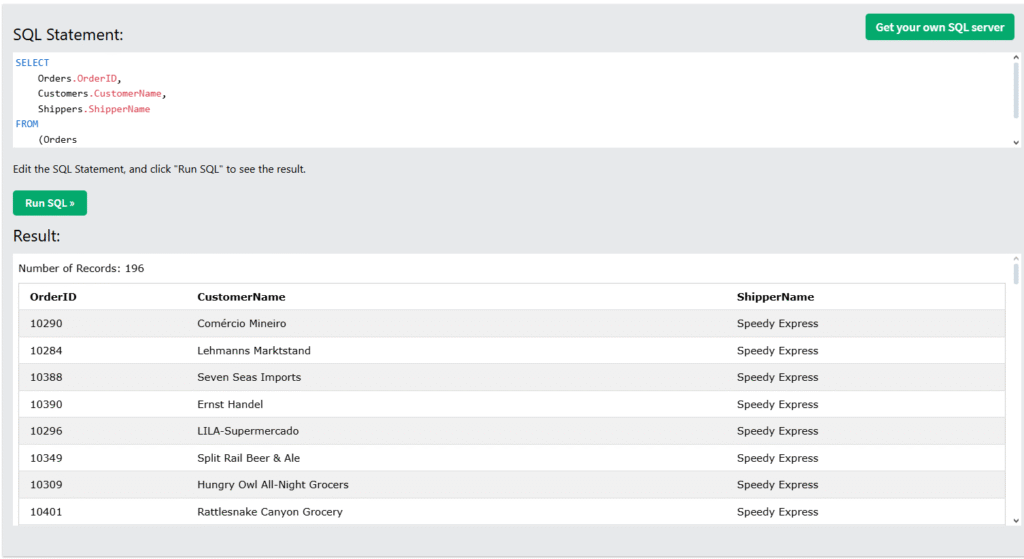
SELECT
    Orders.OrderID,
    Customers.CustomerName,
    Shippers.ShipperName
FROM
    (Orders
    INNER JOIN Customers ON Orders.CustomerID = Customers.CustomerID)
    INNER JOIN Shippers ON Orders.ShipperID = Shippers.ShipperID;
Let's break this down calmly:
SELECT Orders.OrderID, Customers.CustomerName, Shippers.ShipperName– We select the specific columns we are interested in. We useTable.Columnnotation for clarity.FROM (Orders INNER JOIN Customers ON ...)– We start with a join we already know. We take theOrderstable and joinCustomersto it. We enclose this in parentheses, creating a virtual, joined table.INNER JOIN Shippers ON ...– To the result of the first join (which is in parentheses), we attach another table –Shippers. The key here isShipperID.
Run this code. See how beautifully data from three different sources combined into one clear report!
IMPORTANT NOTE
As I mentioned before, the editor provided by W3Schools is simplified, and its SQL is not fully standard. In the example above, we use parentheses ((Orders INNER JOIN ...)). In "normal" environments, these parentheses are not needed (just like the wordINNER, but soon we'll start creating databases on your computer using free and simple tools, then you'll see 🙂
Part 2: LEFT JOIN – What about those who didn't place an order?
The INNER JOIN we've used acts like a bouncer at a couples' party. It only lets in those who have a partner in the second table. It only shows orders that have both a customer and a shipper.
But what if we want to create a list of all our customers and see who among them placed an order, and who didn't?
This is where LEFT JOIN comes in. It works differently. It says: "Show me all rows from the left table (the one listed first), and from the right, attach matching data. If there's no match in the right table, leave a blank space (NULL) there."
Let's create a list of all customers and see their order dates.
SQL
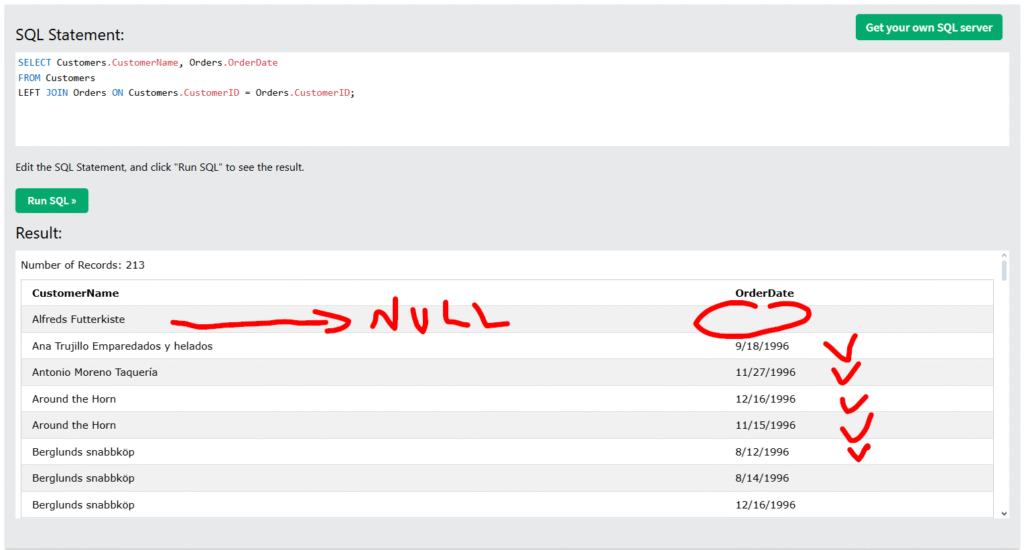
SELECT Customers.CustomerName, Orders.OrderDate
FROM Customers
LEFT JOIN Orders ON Customers.CustomerID = Orders.CustomerID;
What happened here?
FROM Customers LEFT JOIN Orders ...– TheCustomerstable is now our "left" table. This means SQL will take every customer from this table, without exception.- It will then try to attach the order date from the
Orderstable. - If a customer placed any orders, you'll see their name duplicated as many times as they placed orders, with the corresponding dates.
- You can see in the screenshot that Berglunds snabbköp placed three orders.
- If a customer never placed an order, their name will still appear on the list, but in the
OrderDatecolumn, you'll see the valueNULL, meaning "no data."
LEFT JOIN is invaluable when you want to find missing data or see the complete picture, not just the matching elements.
Part 3: ORDER BY – Bringing Order to Chaos
By default, the database returns results in a way that's most convenient for it – often without any logical order. However, we want our reports to be readable. The ORDER BY clause, which we always place at the very end of the query, is used for sorting results.
Let's take our list of all customers and their orders and sort it alphabetically by customer name.
SQL
SELECT Customers.CustomerName, Orders.OrderDate
FROM Customers
LEFT JOIN Orders ON Customers.CustomerID = Orders.CustomerID
ORDER BY Customers.CustomerName;
By default, ORDER BY sorts in ascending order (A to Z, 1 to 100). We would get the same result by writing ORDER BY Customers.CustomerName ASC (from "ascending").
And what if we want to sort in reverse? For example, from the newest orders to the oldest? We use the keyword DESC (from "descending").
SQL
SELECT Customers.CustomerName, Orders.OrderDate
FROM Customers
INNER JOIN Orders ON Customers.CustomerID = Customers.CustomerID
ORDER BY Orders.OrderDate DESC;
Note: I switched back to INNER JOIN here to avoid sorting NULL values for customers without orders.
Summary and Your Task
That was an intense lesson! Today you mastered three incredibly important concepts:
- Joining data from three tables to get a complete picture.
- Using
LEFT JOINto also find data that doesn't have a counterpart in the second table. This means it takes all records from the first table and only matching ones from the second. - Sorting results using
ORDER BYto make them readable and organized.DESCwhen we want the newest, if sorting by date, or the most expensive, if sorting by price.
Your task for today: Write a query that displays the name of each product (ProductName) and the name of the company (SupplierName) that supplies it. The list must also include those products that (theoretically) do not have an assigned supplier. Are there any such products at all? Sort the results alphabetically by product name. The required tables are Products and Suppliers. Let me know in the comments how you did!
What's next?
I'm slowly getting tired of W3Schools and this simple tool; it's time for a database on your computer! (though still simplified) We'll use a file-based SQLite database and the HeidiSQL application. Both tools are free, and you can comfortably practice most SQL capabilities with them.
See you in the next lesson!
0 Comments