
Introduction: Forget "coding," learn to ask precise questions Do the words "database" or "programming" make you feel a little anxious? Do you picture complex screens full of incomprehensible characters? That's natural. With over 20 years in the IT industry, I've seen how technical jargon can be effectively discouraging.
Today, I want to show you that it can be different.
Many years of practicing karate taught me one fundamental thing: strength lies not in complexity, but in precision. A perfectly executed, simple technique is far more effective than ten chaotic moves. It's exactly the same with data.
SQL, the query language for databases, isn't "coding" in the common sense. It's the art of asking precise questions. If you can clearly articulate what you're looking for, you're already halfway there.
In this series of posts, I will guide you through the absolute basics. We'll start without installing complex programs, without technical terminology. Step by step, at a calm pace. Let's begin.
What is a Database? Imagine a perfect filing cabinet
We've all used Excel at some point. Imagine a spreadsheet – it's nothing more than a table. It has columns (e.g., FirstName, LastName, Position, Salary) and rows, where each row represents the data of one person.
A database is simply a collection of such organized tables. It's like a perfectly organized cabinet where each table is a separate, clearly labeled binder. Thanks to this order, finding specific information is instantaneous – as long as you know how to ask for it.
And that's where SQL comes in.
What is SQL? Your personal assistant for searching binders
SQL (Structured Query Language) is the universal language we use to "talk" to almost every database in the world. It's your assistant to whom you give simple commands:
- "Show me all employees."
- "Find me only those who work in the marketing department."
- "Give me a list of products with a price higher than $100."
Simple, right? Our task is just to learn the syntax of these commands.
Your First Query – Let's Get Started!
For our learning, we'll use a simple, free online tool. You don't need to install anything.
Click this link: SQL Tryit Editor – W3Schools
You will see a screen divided into two parts. On the right, there's a list of tables in our sample database (e.g., Customers, Products). On the left is the window where we will write our commands.
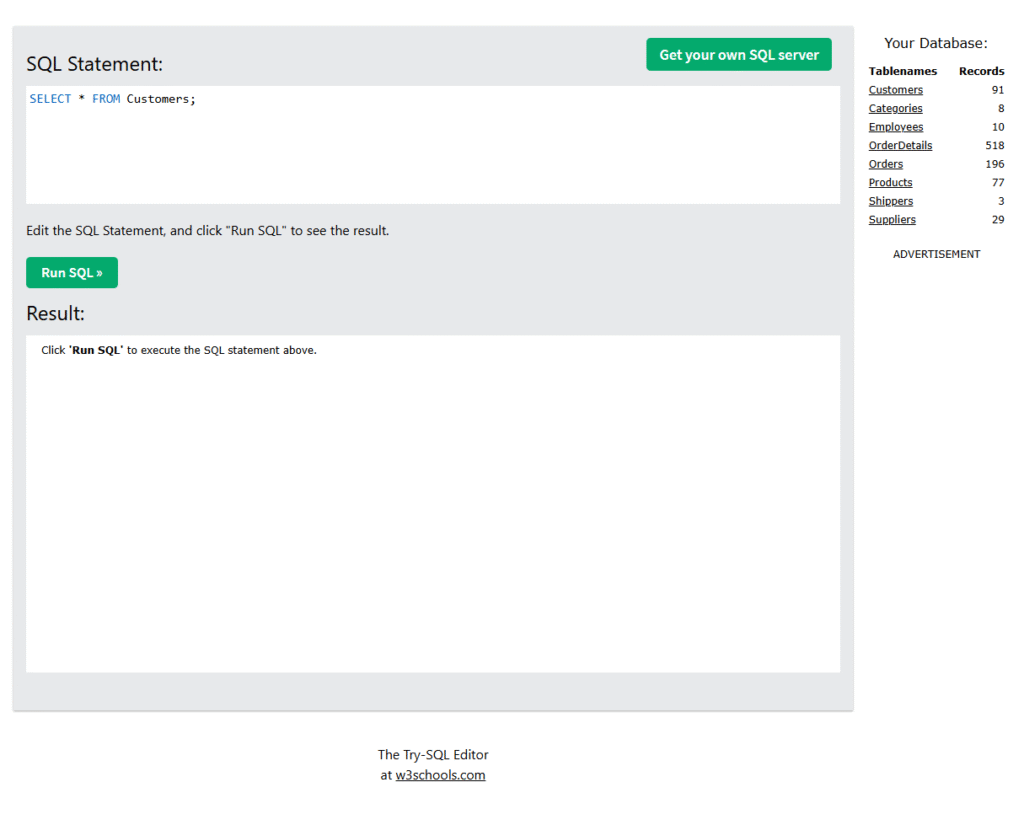
Our goal for today is to display all the information from the Customers table.
In the upper part of the left-hand window, type this exact command (it might already be there; if so, experiment with another name, like Orders or Products instead of Customers):
SQL
SELECT * FROM Customers;
Now, click the green "Run SQL" button.
What happened? The entire table with customer data appeared in the results window below. Congratulations! You've just executed your first, perfectly correct SQL query!
What did we actually write? Let's break down the command
SELECT– This is the most important word. Whenever you want to select (display) something from the database, you start withSELECT.*(asterisk) – This is a shortcut that means "everything" or "all columns."FROM Customers– We're telling the database where to get the data from. In our case, from the table namedCustomers.;(semicolon) – This is like a period at the end of a sentence. It informs the database that our command ends here.
What if we don't want everything? What if we only want to see the customers' names (CustomerName) and the city they are from (City)? Nothing could be simpler. Instead of the asterisk, we list the column names separated by a comma:
Try typing and running this command now:
SQL
SELECT CustomerName, City FROM Customers;
See how the result changed? The database obediently showed us only the two columns we asked for. This is the essence of the precision I was talking about.
Summary and Homework
Today you've learned three fundamental things:
- A simplified idea of what a database and a table are.
- What the SQL language is used for.
- How to use the
SELECT ... FROM ...command to display data.
Your homework is simple: experiment! Using the same online tool, try to display:
- All columns from the
Productstable. - Only the names and prices (
ProductNameandPrice) from theProductstable. - Data from any other table you see in the list on the right.
In the next lesson, we'll learn how to filter data – that is, how to set conditions to find exactly what we're looking for (e.g., customers only from London).
Do you have any questions? Was something unclear? Let me know in the comments – I'm here to help.
0 Comments